Parts Counting Scale
by Jared Julien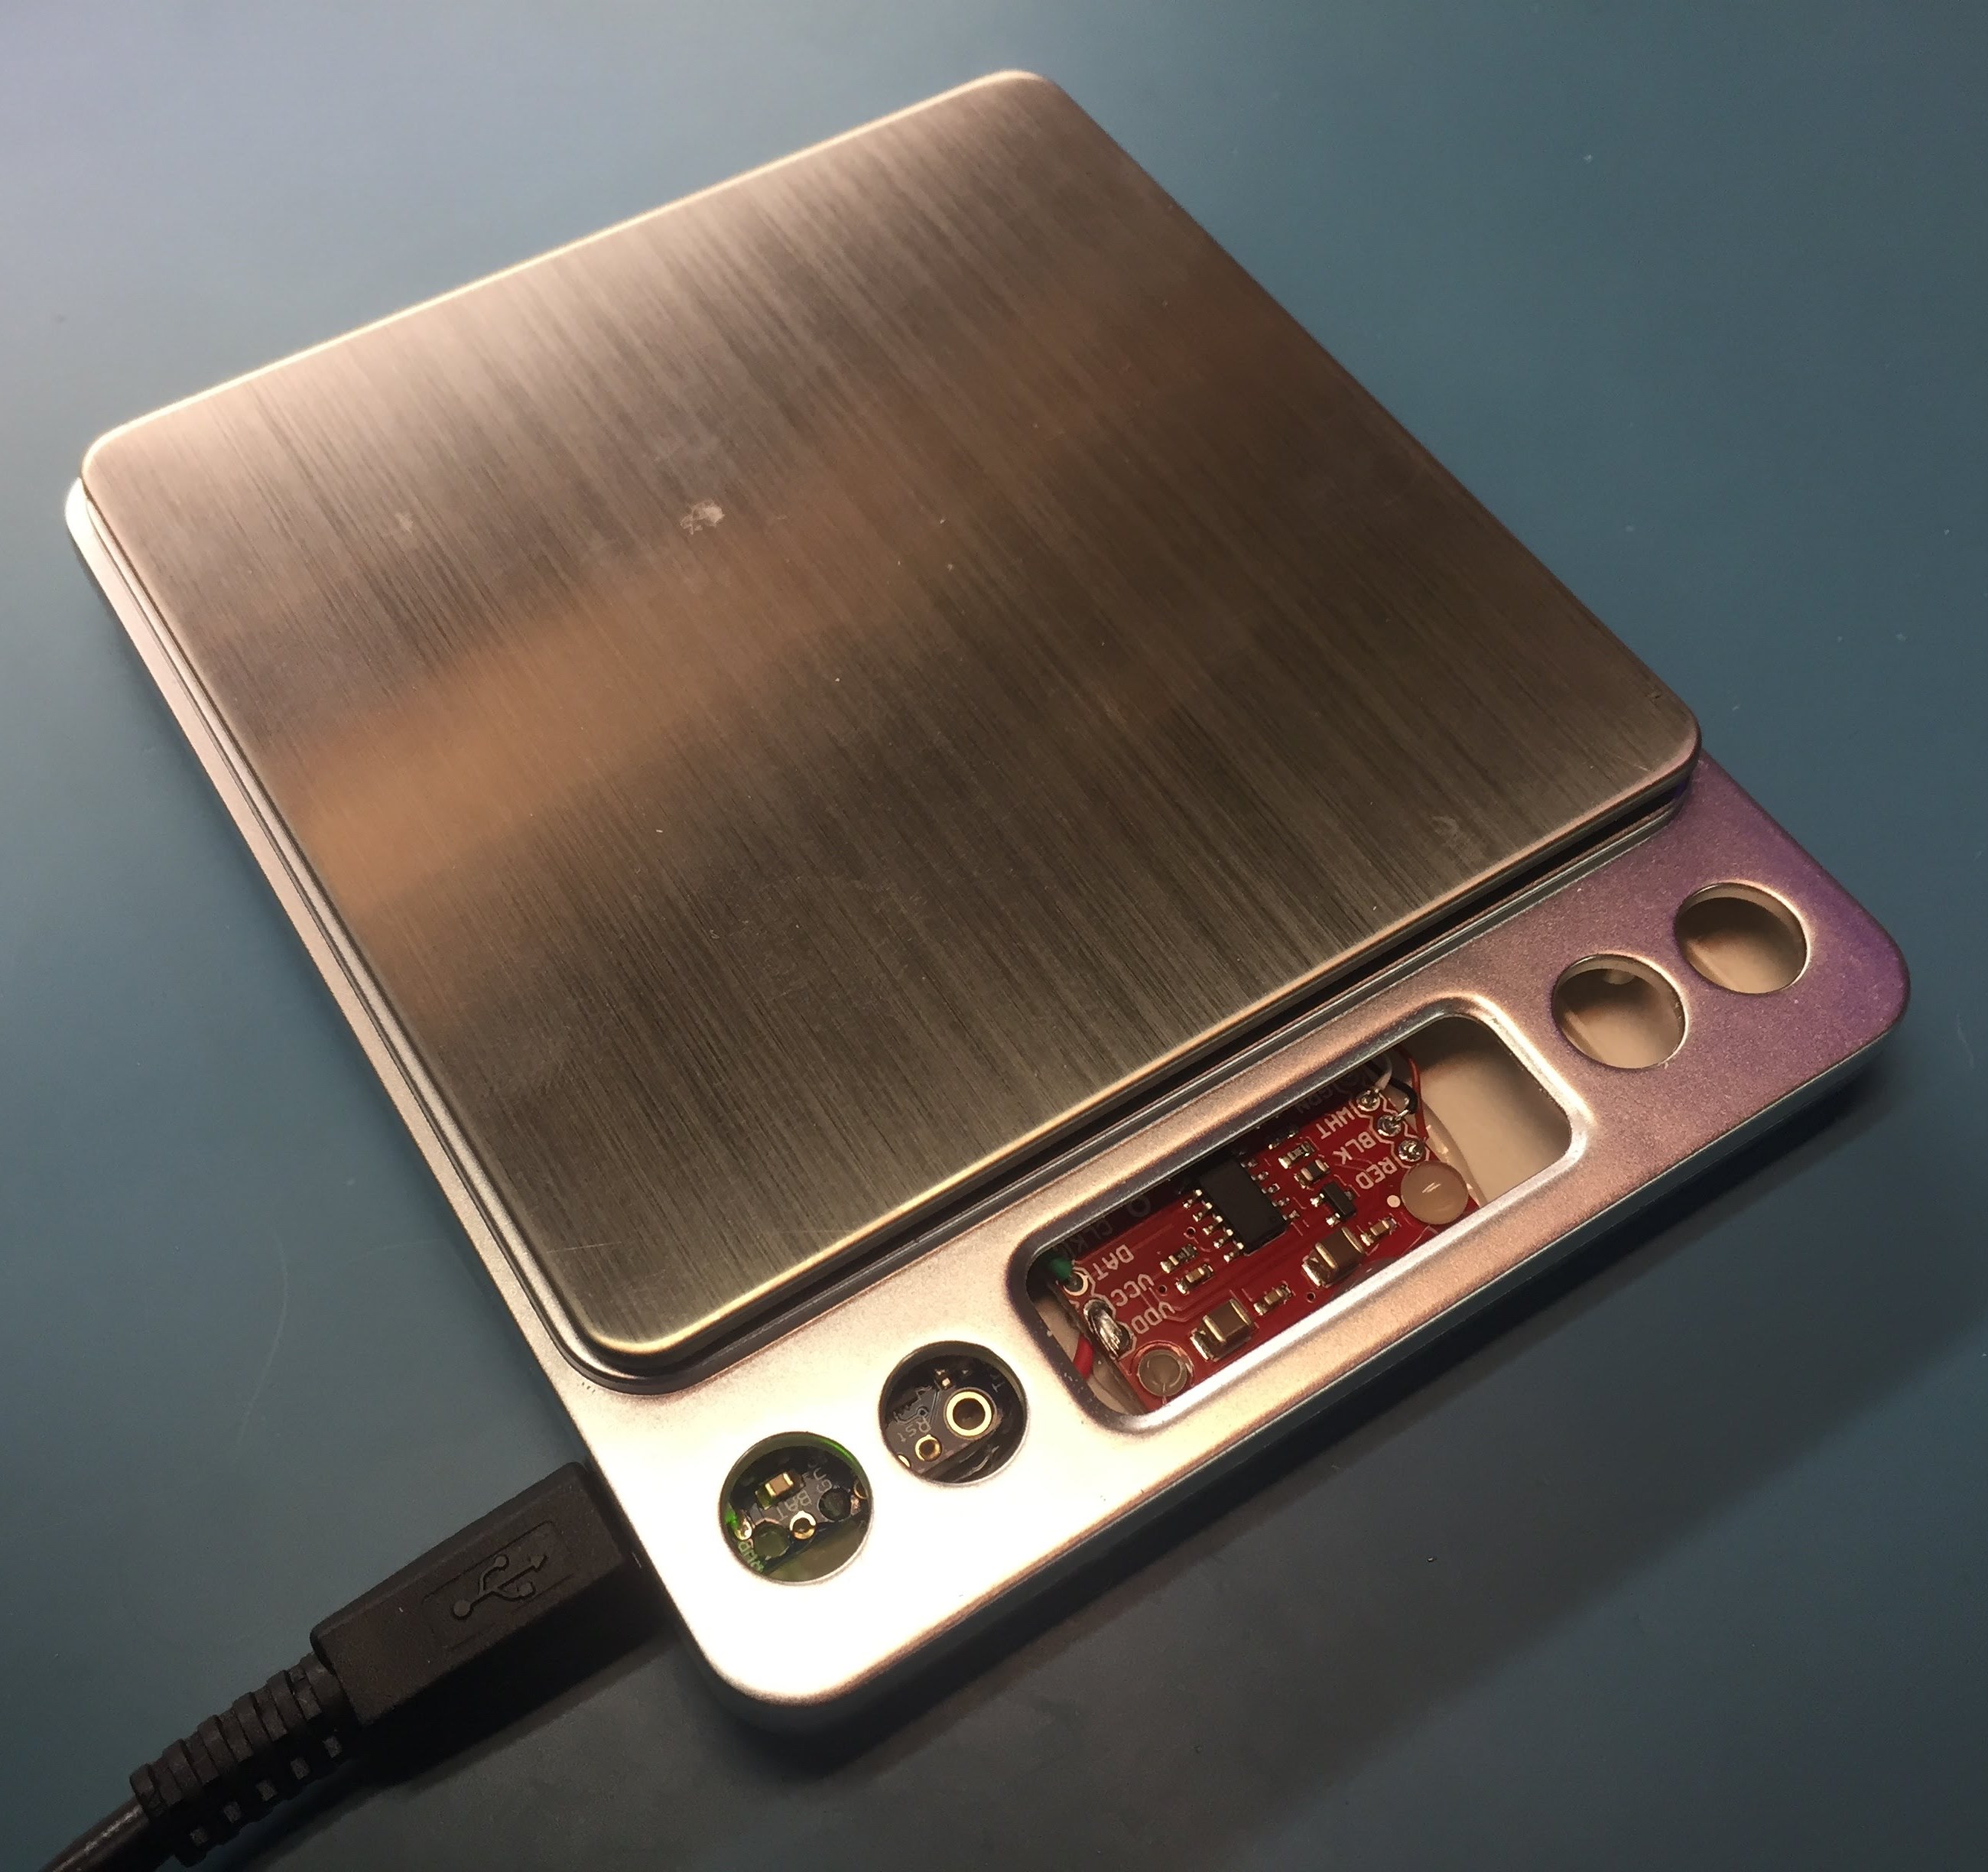
Scales capable of counting parts are a dime a dozen across Amazon these days. The problem with them is that not a single one supports a connection to a computer. As part of a larger project for inventorying parts I wanted a scale that was able to connect with host software to save me from inputting readings and calibration. So I picked up one of those cheap scales and started hacking.
The Premise
This project was started after I began work on creating an physical inventory system. I have a problem. No really, I can’t find parts. When working on projects I always order spare components just in case I fire one out of my tweezers while soldering the PCB or in case I release the magic smoke due to botched firmware. When I’m done developing the project the spare parts usually get tossed in a Rubbermaid tote and shoved in the corner.
These parts have really begun to build up over the years and there are times where I end up reusing sub circuits for another project which leaves me rummaging through the tote trying to figure out if I even have any more of a given part on hand.
Some time ago, after moving into my new house, I started to get a bit more organized (I will probably write up an article on my organization scheme at some point). Long story short, I started to finding permanent homes for the parts that I constantly re-use in projects. The new problem was knowing which parts I stock, how many of them that I had, and what the part number was when I needed to order more.
I started using an Excel spreadsheet to track this information but it proved too difficult to keep physical counts up to date as that required that I fire up my computer and increment or decrement the count each time I take a part out or put a part back. I realize that it’s not difficult but because it’s not “easy” I just didn’t do it or I figured that I’d do it later (which is silly, my Shih Tzu has a better short term memory than I have).
Enter my idea for a web-based inventory system. As a supplement to the software I plan to eventually create a kiosk that stands adjacent to my parts storage area with the sole purpose of facilitating updating the inventory database. The goal will be to barcode every storage location allowing me to simply scan the drawer or box when grabbing a part and then use a simple increment/decrement button on a touchscreen to update the quantity stored in the database.
The problem even with this is that it will still require me to occasionally count the parts to keep the database synchronized. And when entering the initial data into the system I need to count the parts. This task isn’t too daunting with regard to my collection of red T1-3/4 LEDs where I’m talking about ten or fifteen of then. It’s another story with the drawer containing 453 rectifier diodes. Yes, I counted them. By hand. It was miserable.
That activity made me realize that I needed a better way. I had seen the big, fancy, expensive parts counters before but couldn’t find a single on that had a serial/PC connection of some kind that was affordable. The only scales that offer a USB connection are in the hundreds to thousands of dollars range. I really want to PC connection to allow the inventory tracking software to be able to read the count directly from the scale avoiding error and labor in entering the numbers.
I also envision being able to count out a sample set of 30 or 50 parts and weight them. The total weight divided by the count is a fairly accurate per-piece weight which I then want to store in the database, associated with the part. Then in the future when I want to count them again I wont need to recount a sample set. I will just need to scan the parts barcode, tell it that I want to recount, tare the scale, and dump them on. I should even be able to take that a step further and add tare weight for common storage contains so as not to require transferring any parts, just reweighing.
So I set out on an adventure to build a USB connected scale that is accurate enough to weigh small parts such as resistors and diodes somewhat accurately. I set a tolerance requirement of +/-1 percent (one part in 100) of parts before I dove in.
Round One
The first scale that I picked up was a 110lb rated postal scale. I knew nothing about scales so the biggest selling point was that it had a cable between the load cell and the electronics bits which were physically detached. While the cable did make for easy hacking, the large capacity of the scale meant that I was actually using very little range when measuring very small and light electronics components.
I wired the scale through a SparkFun HX711 load cell amplifier and to an Adafruit Trinket 5V. I adapted some existing software that I had written for the Trinket making use of VUSB which is a firmware-only (bit-banged) version of the USB protocol. The device is setup as a custom USB device and uses control transfers to request readings. More details on the firmware can be found below.
My initial tests with the device involved the scale factor and offset values being stored on the Trinket and the read over USB would return an average of many samples. This setup later proved ineffective as it was overly complicated to configure all of the parameters over USB and I was experiencing issues with storing values in the Trinket’s EEPROM. Rather than spend the time to sort out the issues I opted to make the firmware very simple and have it return only the raw readings from the amplifier, allowing the host software to manage the offset and scale factor as well as the averaging of readings.
I attempted to create a counter script that would handle calibration of the scale against a number of samples, compute the per-piece weight, and then count components but the numbers were all over the place, typically off by as much as 100 components when counting a pool size of 400 and calibrating on 50 components. +/-25% far exceeded my goals for the project.
Later I hacked together another script that plotted the reading over a 60 second period in a Pygame window and it became evident that the noise on the readings was far greater than the delta when a single part was placed on the scale. It seemed to make no difference how much filtering or averaging I did, it was just impossible to get consistent results.
Round Two
I threw in the towel and ordered some new parts. I went back to Amazon and picked up a new scale and a calibration weight. This scale is rated for a maximum capacity of 500g (1/100 the range but 100 times the resolution of my previous scale) which should still be way over any pile of parts I’ll be weighing.
I also snagged an updated version of the load cell amplifier from Sparkfun. The newer version they’re now selling has an inductor on the excitation lines going out to the load cell and I hoped that might further help reduce the noise.
I’ll admit I felt a little guilty ripping the brand new scale apart literally within minutes of it’s unboxing. After taking the case apart I clipped the load cell wires off the original electronics and tossed them in the trash. I connected the wires to the new Sparkfun mplifier and the existing Trinket to start testing. It was immediately obvious that the new scale is much more sensitive using much more of the available range for the HX711.
I used my shiny new calibration weight to calibrate the readings and setup a proper offset and scale factor. This step is not critical for the counting of parts as the number of counts returned from the HX711 could be used to do the same without ever converting to standard units such as grams. I wanted to be able to store a part weight in grams or milligrams in the database as well as be able to show the total weight in a human friendly format so I elected for calibration.
Creep became a bit of a problem, or so I thought, from the beginning. I was also worried that my reading were being thrown off by temperature swings. So I created an ISR on the Trinket to keep consistent time for tracking creep and began the process of integrating a temperature sensor.
The DS18B20 sensor was an obvious choice for temperature as I only had a single pin left on the Trinket and it’s a one-wire sensor. I did run into a snag though as the one-wire protocol is bit-banged too and stopping interrupts to handle the one-wire communication results in the USB connection being dropped. I resorted to moving the temperature reads from the sensor into the periodic function, requesting temperature conversions constantly. Then when the host requests the temperature over USB the most recent reading gets returned.
I was consistently off by about 30 parts when counting the same sample pool as with the earlier version of the device. The difference this time is that it was fairly consistently off, always +30 or so. So I decided to recount my sample pool just to be sure that I hadn’t initially miscounted. When I dumped the parts on the table I had an epiphany! There were 28 diodes in the sample pool that still had full wire leads on them while the remainder had been trimmed to a shorter but consistent length already. It turns out that those parts were roughly double the weight of the others.
After excluding the 28 odd parts I re-ran the counting procedure. With a sample size of 50 1N4004 rectifier diodes I was able to measure 372 diodes +/-0%, far better than I anticipated. I am very pleased with these results.
Final Assembly
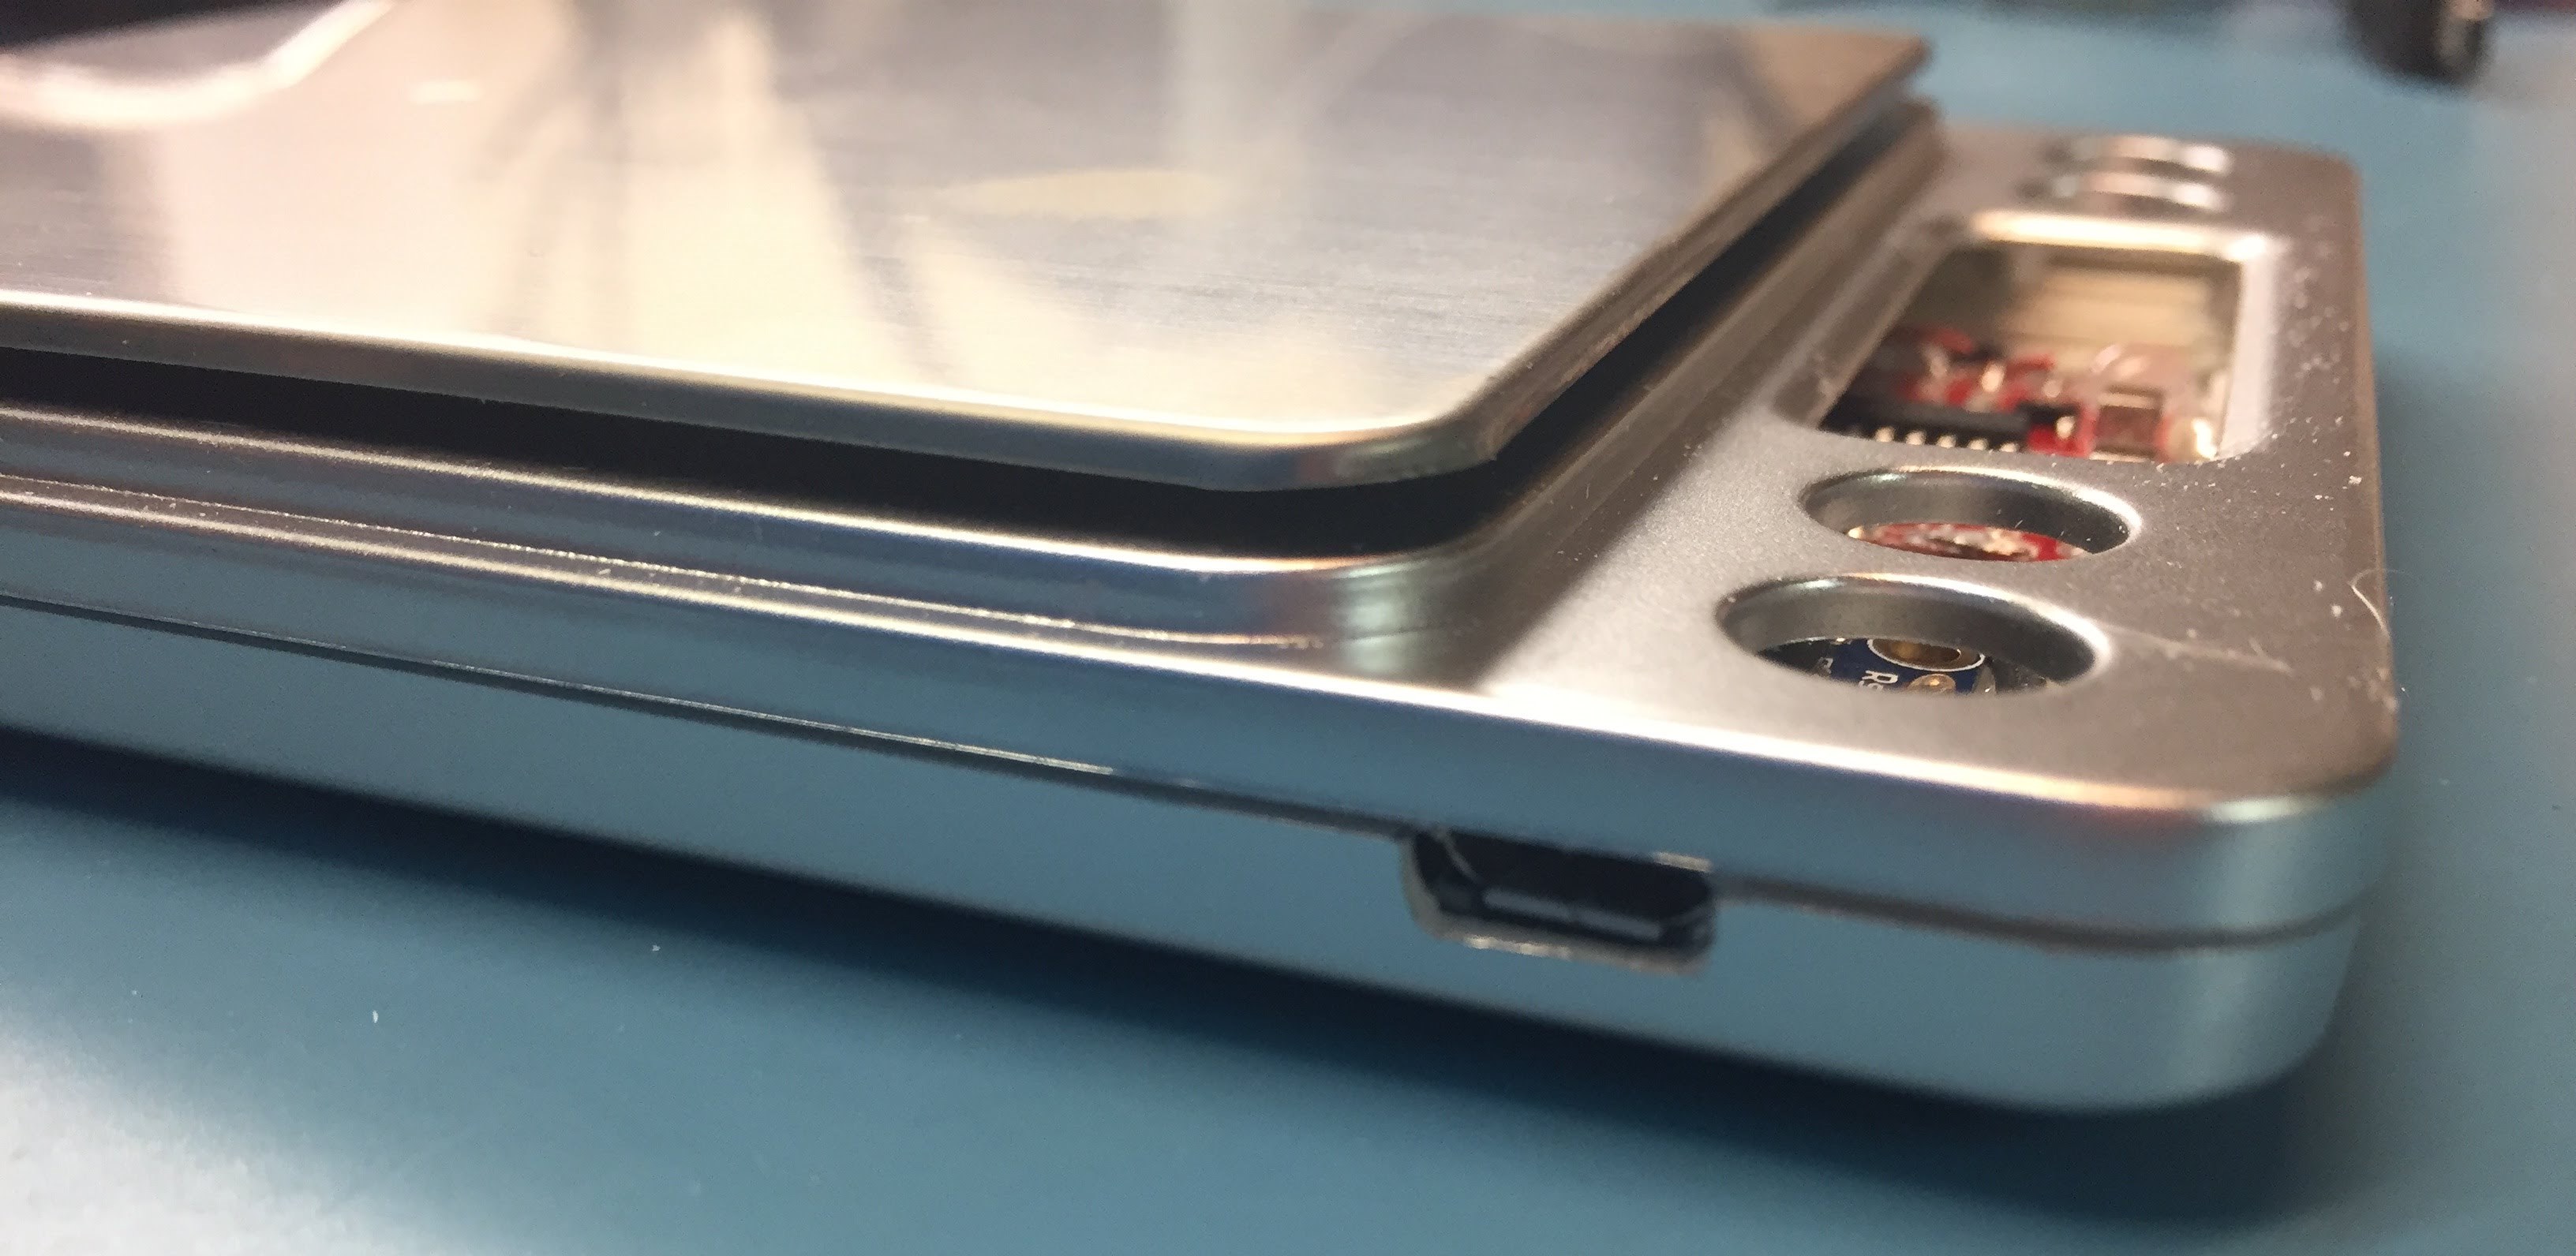
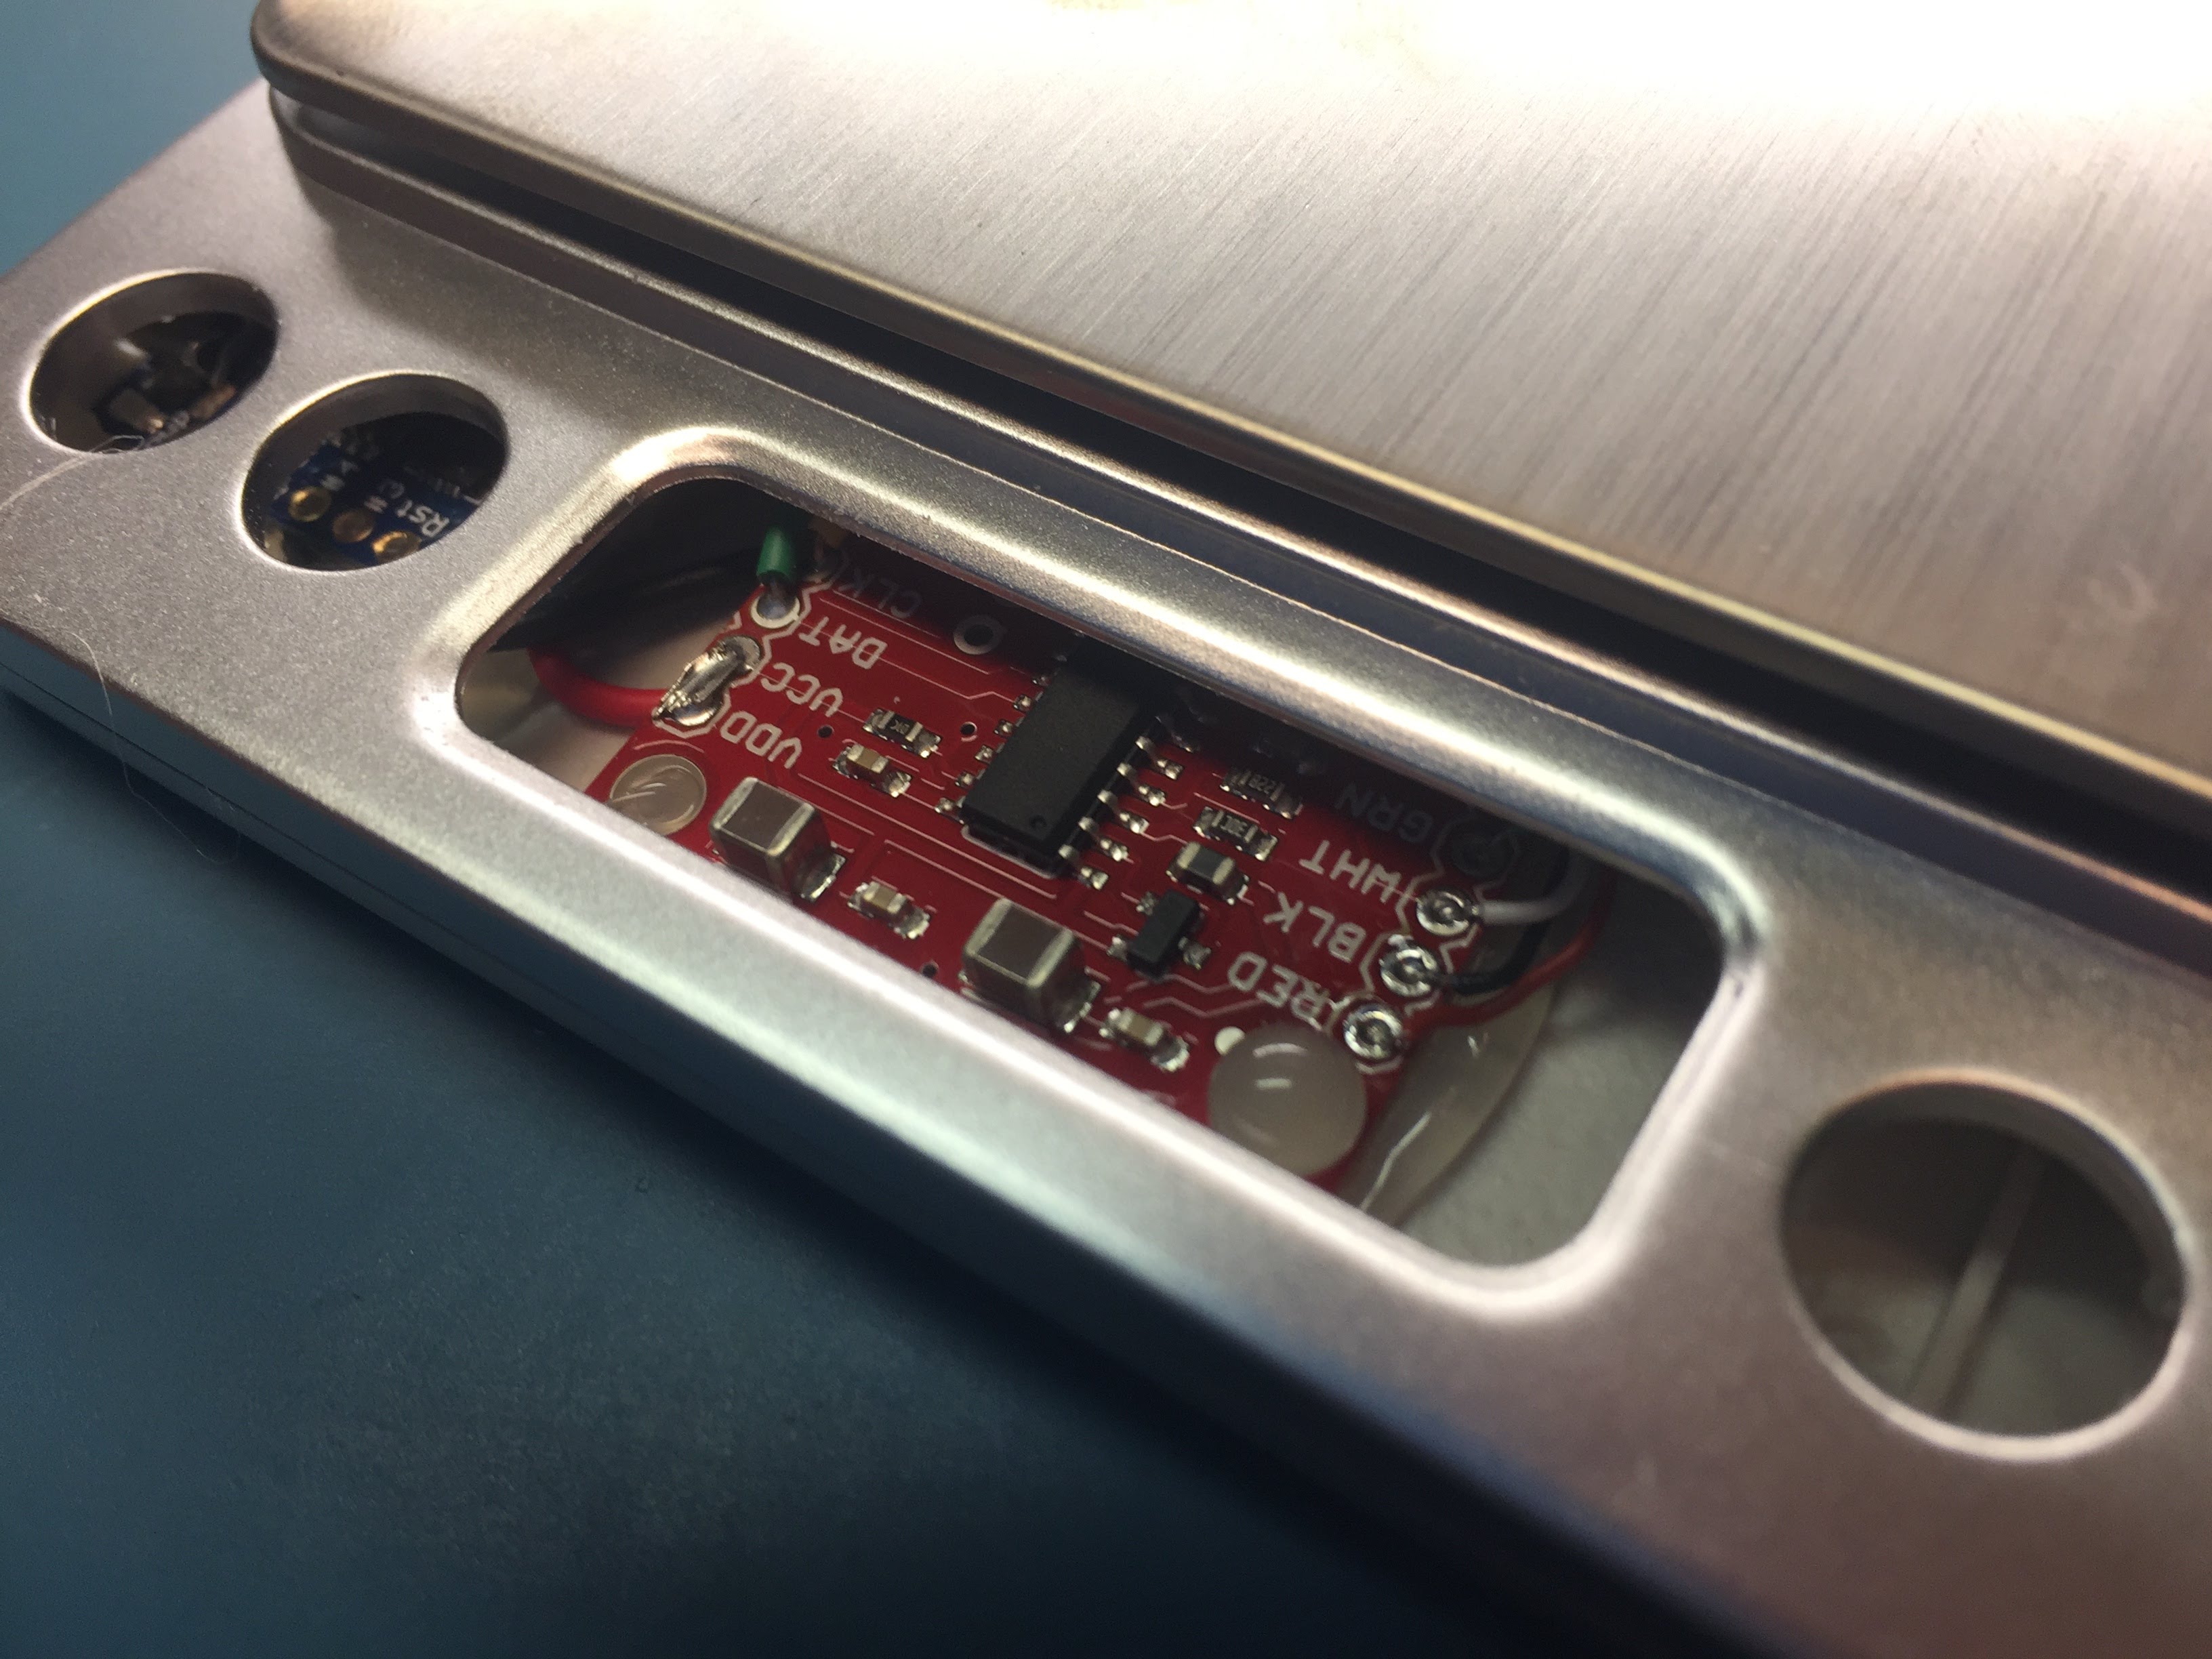
I wanted to mount my new electronics bits in the original case for the scale but there were a few obstacles to deal with. I dug out my Dremmel tool and removed everything from inside the case that wasn’t absolutely necessary. I also used the Dremmel to make a notch in the side of the case for the USB connector to pass though.

I permanently wired and soldered together the load cell amp and the Trinket as well as the DS18B20. Next, I glued the boards into the enclosure using a generous amount of hot glue figuring that would be reasonably easy to remove should I need to so any future rework.
Finally I re-attached the wires for the load cell to the amplifier and assembled the case. A quick recalibration and the scale is working like a champ.
My apologies for not taking more pictures of the assembly before putting the case back together. I you have an interest is seeing more, please leave a comment below and I will use that as motivation to tear it apart and take more pictures.
Firmware
The firmware for the scale makes use of VUSB to manage communication with the host software. The firmware was written in C because VUSB is also written in C. This poses some problems with attempting to re-use existing Arduino libraries (generally C++) for the HX711 or DS17B20 which meant that I had to lovingly port the libraries into C. This also gave me an opportunity to strip out all of the bits that were not strictly required for this project.
The USB interface is configured as a control endpoint and uses the the request filed to specify what to read.
- CMD_GET_VERSION (0x00)
- Return the version of the firmware loaded onto the device.
- CMD_SET_GAIN (0x01)
- Set the gain for the HX711. Default is 128. Available options are 128, 64, or 32.
- CMD_PWR_OFF (0x10)
- Power off the load cell amplifier. This can be handy for reducing heating from continuously powering the device.
- CMD_PWR_ON (0x11)
- Power on the load cell amplifier after previously powering down using command 0x10.
- CMD_READ (0x20)
- Read the current weight on the scale. The raw value is returned in counts as 24-bit signed value. This can take up to 10ms to process as the USB request will wait until a conversion on the HX711 is ready.
- CMD_TEMPERATURE (0x30)
- Read the last temperature that the device read from the DS18B20 sensor. Value is returned as int16 scaled to maximum range. Divide by 128 to get temperature in degrees Celsius.
TL;DR
The most important lesson learned with this whole project is to ensure that all of the parts being counted are uniform. When some parts are different shapes or sizes this method of weighing them to count them is likely to fail.
Total Cost
| Part | Price |
|---|---|
| Scale | $12 |
| Amplifier | $10 |
| Trinket | $7 |
| Temp Sensor | $5 |
| Total: | $34 |
The next cheapest USB connected scale that I came across in my brief search of the interweb was about $300 so for the accuracy that I’m achieving and at only 1/10th the cost, I’m a pretty happy guy.
Leave a comment below if you found any of this useful or have any questions. I would love to get some feedback on the project.